
Workplace Hazard Identification: Safety for Teams and Lone Workers
Identify workplace hazards, assess who could be harmed, and plan safer work—whether employees work together or alone.
Workplace hazards can affect an entire team or a single employee working alone. Moving equipment, chemical exposure, blocked walkways and unclear emergency procedures can create different risks depending on the task, location and people involved.
Workplace hazard identification helps employers and employees recognize what could cause harm, understand who may be exposed and decide what needs to change. This guide covers common hazards, practical assessment steps, team and lone worker considerations, and a checklist for reviewing your workplace.
The Workplace Safety Assessment is free. Send the short form and our team calls you back to arrange it. It is not an OSHA inspection or a certification.
Checked against OSHA sources on .
Request a Workplace Safety Assessment
Six quick fields. Our team will call the number you give to arrange a free review of your hazards, including tasks done in teams and alone.
- A call from our team to arrange your free assessment
- A review of your jobs, including cleaning and maintenance, and the controls that need attention
- Free printable job-hazard worksheets with your account
What happens after you send the form
- You send the form. No credit card is needed.
- Our team calls the phone number you give.
- Together we arrange your free Workplace Safety Assessment.
Meanwhile, you can print the job-hazard worksheet with your free account.
From hazards to a reviewed evacuation-map draft
- Identify hazardsWalk the work with the people who do it, in teams and alone.
- Record corrective actionsGive every finding an owner, a date and a check that the fix works.
- Review emergency arrangementsAlarms, exits, head counts and how someone working alone gets help.
- Create a reviewed evacuation-map draftDraft the map, then check it on site before it is posted.
What is workplace hazard identification?
Workplace hazard identification is the process of finding anything at work that could cause injury or illness, such as a condition, a substance, a piece of equipment or a way of working, and recording who could be harmed and when.
It is the first step of hazard identification and risk assessment: a hazard nobody has noticed cannot be judged or controlled. Each finding then moves on to a risk assessment and, where needed, a corrective action.
Employers lead it, but the people doing the work see the most. OSHA’s safety and health program guidance describes employers and workers identifying and assessing hazards together. Include supervisors, workers from every shift and task, maintenance staff, contractors where relevant, and anyone who works alone or off hours, because their hazards rarely show up during a daytime walkthrough.
It needs to happen regularly because hazards change: equipment wears, layouts shift, staffing drops on a night shift, a new chemical arrives. OSHA calls the failure to identify or recognize hazards one of the “root causes” of workplace injuries, illnesses and incidents, and describes hazard identification as a proactive, ongoing process rather than a one-time inspection.
- What could cause harm: conditions, substances, equipment and ways of working.
- Who could be harmed: teams, people working alone, contractors and visitors.
- When it happens: routine work, nonroutine tasks and emergencies.
Hazard vs. risk: what is the difference?
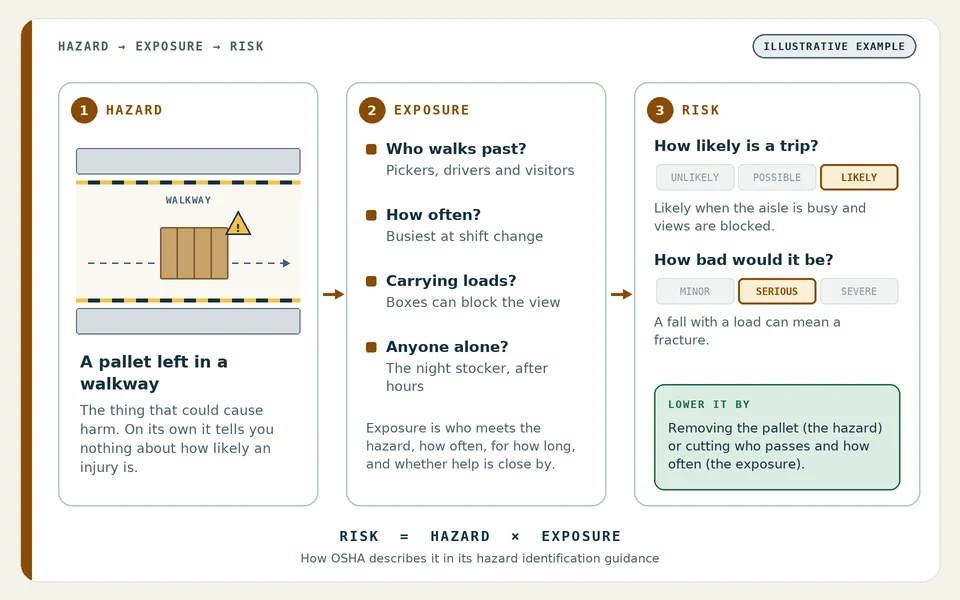
A hazard is the thing that could cause harm. Risk is the chance that it actually does, combined with how serious the harm would be and how many people are exposed.
An obstructed walkway is a hazard. The risk concerns someone tripping over the obstruction and being injured. That risk is higher at a shift change when the aisle is busy, higher still for someone carrying a load that blocks their view, and different again for an employee who falls when no one else is in the building.
OSHA notes that risk is the product of hazard and exposure. So a risk can be lowered in two ways: remove or control the hazard, or reduce how often and how long people are exposed to it.
| Hazard | Who could be harmed | The risk to assess |
|---|---|---|
| A pallet left in a walkway | Anyone using the aisle, including visitors | A trip or fall, worse when carrying loads or in poor light |
| An unguarded rotating shaft on a conveyor | The operator and anyone clearing a jam | Clothing or hands caught, leading to serious injury |
| Bleach stored next to an ammonia-based cleaner | Cleaners, often working alone after hours | A toxic gas if the two are mixed, with no one nearby to help |
Common types of workplace hazards
Most workplace hazards fall into a few families. Use them as prompts during a walkthrough, not as a complete list: OSHA’s own guidance says each workplace will have its own list.
Machinery
Points of operation, rotating shafts, conveyors and nip points, unexpected start-up during cleaning or maintenance, and forklifts and other mobile equipment.
Electricity
Damaged cords, overloaded outlets, blocked electrical panels, wet locations, work near energized parts and energy stored in equipment.
Chemicals
Cleaning products, solvents, fuels, dusts, fumes and gases. Check safety data sheets and labels, and look for incompatible products stored together.
Biological exposures
Blood and body fluids, mold, sewage, animal materials and infectious diseases, especially in healthcare, cleaning, waste and food work.
Ergonomics
Heavy or awkward lifting, repetitive motions, work above shoulder height, long periods in one posture and vibrating tools.
Slips, trips and falls
Wet or uneven floors, clutter, cords across walkways, poor lighting, ladders, loading docks, mezzanines and unprotected edges.
Fire
Ignition sources near combustibles, hot work, blocked exits, propped fire doors, unchecked extinguishers and alarms people cannot hear.
Violence
Threats or assaults linked to cash handling, public contact, late hours, high-crime areas and working alone or in isolated areas.
Work organization
Long shifts, fatigue, understaffing, rushed deadlines, unclear roles, poor handovers and new or temporary workers who do not know the site.
Go deeper with the workplace hazards guide, OSHA’s five general hazard categories and electrical safety in the workplace.
How to identify workplace hazards
Use six sources of evidence. Together they cover what has already gone wrong, what the work looks like today and what could happen in an emergency.
Review records
Start with what you already have: injury and illness records such as OSHA 300 and 301 logs, first-aid notes, near-miss reports, workers’ compensation claims, inspection or insurer reports, equipment manuals and safety data sheets. Look for patterns, not just single entries.
Involve employees
Ask the people who do each task what goes wrong, what slows them down and what they work around. Talk to every shift, including night cleaners, weekend security and anyone who works alone. A short, no-blame conversation at the workstation often finds more than a form.
Inspect the work
Walk every area while work is happening, including storage, yards, roofs, maintenance shops and contractor areas, and watch tasks from start to finish. Photograph problems so fixes can be checked later. Fix simple things, such as housekeeping and tripping hazards, as soon as you find them.
Assess health exposures
Health hazards are easy to miss because many are invisible or slow to cause harm. Check safety data sheets and labels, note areas where people must raise their voices to be heard, and look for heat, dust, fumes, biological material and heavy or repetitive work. Where an exposure limit could be reached, measure rather than guess.
Investigate incidents
Treat every injury, illness and close call as evidence. Keep asking why it happened until you reach the conditions behind it, not just the person involved, then look for the same conditions elsewhere.
Consider emergencies
Think through foreseeable emergencies and nonroutine work: fires, chemical spills, severe weather, medical emergencies, workplace violence, startups after shutdowns and once-a-year maintenance. For each, ask who would be on site, how they would be warned and where they would go.
Record each finding as you go: the hazard, its location, the task, who could be harmed and what already controls it. For a task with several hazardous steps, break it down with a job hazard analysis template. For PPE decisions, use the PPE hazard assessment form, and for a room-by-room record, the workplace hazard assessment form.
Hazards when employees work as a team
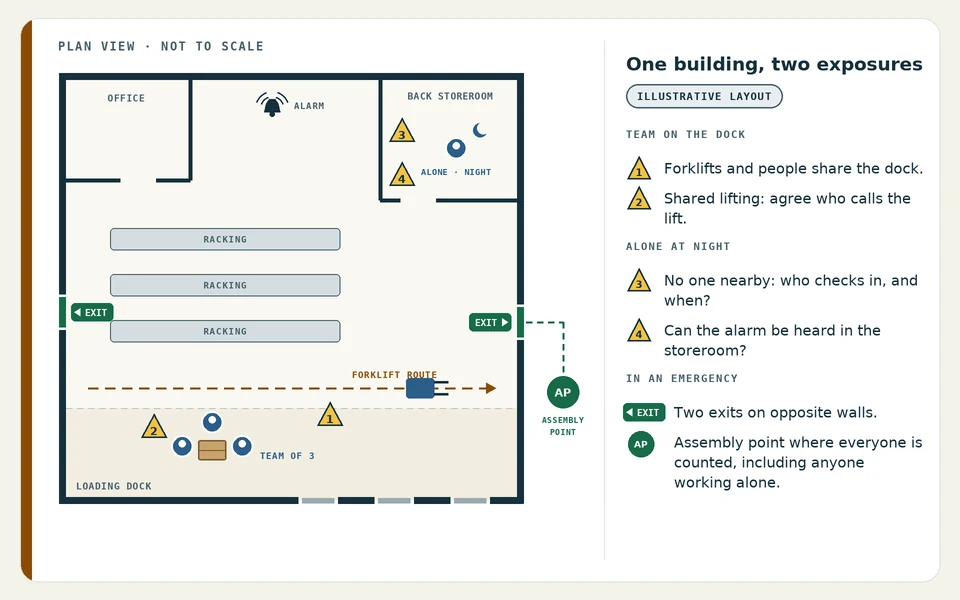
Working together adds hands and eyes, but it also adds hazards that do not exist when one person works alone. Most come from coordination: who does what, when and where.
Overlapping tasks
One crew’s work creates a hazard for another, such as a floor being mopped on a delivery route or overhead work above a walkway.
Ask: Are tasks sequenced or separated so their hazards do not stack up?
Unclear responsibilities
Everyone assumes someone else isolated the machine, checked the load or called it in.
Ask: Does every safety-critical step have one named person?
Simultaneous operations
Two jobs on the same equipment or in the same space at the same time, such as maintenance during production.
Ask: Is there a permit, a coordinator or a sign-off before the second job starts?
Shared equipment
Tools, ladders, vehicles and PPE passed between people without checks or cleaning.
Ask: Who inspects shared equipment, and how is a defect reported and taken out of use?
Vehicle movements
Forklifts, pallet jacks and delivery trucks moving where people walk, often with blind spots.
Ask: Are pedestrian routes marked and separated, and do drivers and walkers know the rules?
Communication failures
Noise, language differences, radios on different channels and missed handovers between shifts.
Ask: How does critical information reach everyone, including temporary staff and contractors?
Some OSHA standards build team coordination into the rules. When a crew services machinery under lockout/tagout, 29 CFR 1910.147(f)(3) requires a group procedure that gives each employee protection equivalent to a personal lock or tag, and 1910.147(f)(4) requires specific procedures for the orderly transfer of that protection at shift or personnel changes.
Brief the team before the work starts. Our toolbox talks cover forklift safety, lockout/tagout and safe lifting, and the warehouse guide explains a traffic management plan.
Hazards when employees work alone
An employee works alone when no coworker can see or hear them: a night cleaner, a technician in a plant room, a clerk closing a store, a driver, or someone in a remote part of a large building. The hazards of the task may be the same as in a team. What changes is how quickly anyone would know that something went wrong.
Delayed assistance
After a fall, a cut or a sudden illness, help arrives only when someone notices.
Ask: How long could this person go unnoticed, and is that acceptable for the worst outcome of the task?
Isolation
Remote areas, locked rooms, cold stores, roofs and basements.
Ask: Could the person be trapped, and how quickly could anyone reach them?
Communication problems
Dead zones, phones left in lockers, noisy areas and radios out of range.
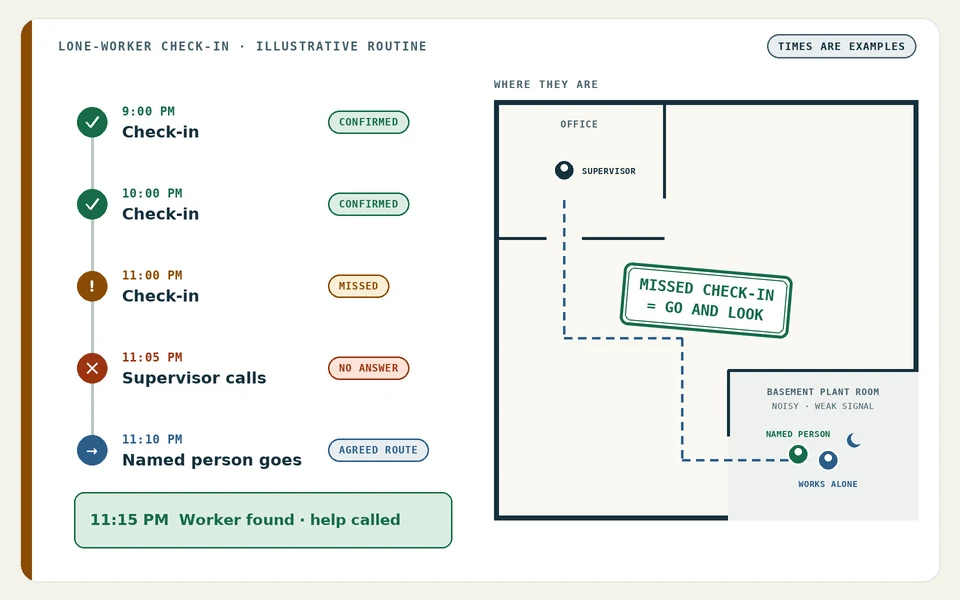
Ask: Does the check-in routine work where the person actually is, and what happens when a check-in is missed?
Security concerns
Cash handling, opening and closing, public contact and late hours. OSHA notes that working alone or in isolated areas may contribute to the potential for violence.
Ask: What entry controls, lighting and ways to call for help are in place?
Difficulty raising an alarm
An alarm only protects people who can perceive it. Under 29 CFR 1910.165(b)(2), an employee alarm must be perceivable above ambient noise or light levels by all employees in the affected parts of the workplace.
Ask: Would someone in a freezer, a noisy plant room or a far corner hear or see it, and could they report an emergency themselves?
Federal OSHA has no single standard for working alone, but some standards require a second person for specific work. For example, entry into a permit-required confined space needs at least one attendant outside the space for the whole entry (29 CFR 1910.146(d)(6)). Check the standards that apply to each task, and treat “can one person safely and lawfully do this?” as a question for the assessment, not an assumption.
Some states add their own rules. The cleaning guide lists janitorial worker protection laws by state, including rules written for janitors who work alone.
Free. Tell us which tasks are done alone and our team will call you to arrange the review.
Assess and prioritize the risks
Once hazards are on the list, decide which to fix first. OSHA’s guidance suggests evaluating each hazard by the severity of potential outcomes, the likelihood that an event or exposure will occur, and the number of workers who might be exposed.
Severity
What is the worst realistic outcome: first aid, lost time, permanent harm or death?
Likelihood
How likely is it under current conditions, given how often the task happens and how well the controls hold up?
Exposure
How many people, how often and for how long? For lone work, include how long help would take to arrive.
Put interim protection on serious hazards straight away, then plan permanent fixes, working down the hierarchy of controls from elimination to PPE. If you want a simple scoring grid, the Workplace Safety Assessment guide shows one way to use a risk matrix.
Prioritizing sets the order, not whether to act: OSHA notes that employers have an ongoing obligation to control all serious recognized hazards and to protect workers.
Assign each corrective action to a named person with a date, and verify completion. A finding is only closed when someone has seen the fix working during real work.
| Finding | Who could be harmed | Interim step | Permanent fix | Owner and date | Verified |
|---|---|---|---|---|---|
| Pallets parked in the aisle to the rear exit | Everyone; the night stocker works alone | Aisle cleared and floor marked | Overflow staging area set up by receiving | Warehouse lead, in two weeks | Open until checked on a busy night |
| No way to call for help from the basement | One cleaner, every night | Phone check-in at set times | Radio coverage or another check-in that works in the basement | Facilities manager, in 30 days | Open until tested in the basement |
Practical workplace hazard examples
The same task can carry different hazards depending on whether people do it together or alone. The prompts below compare five common activities. They are illustrative assessment prompts to start the conversation, not a complete assessment of any task.
| Work activity | When working in a team | When working alone |
|---|---|---|
| Moving materials | Review coordination, shared lifting and nearby people. | Review load handling and access to assistance. |
| Cleaning | Review exposure to coworkers, wet areas and overlapping tasks. | Review isolation, communication and emergency access. |
| Equipment maintenance | Review responsibilities, handovers and simultaneous work. | Determine whether the task can safely and lawfully proceed alone. |
| Warehouse operations | Review pedestrian and vehicle interactions. | Review isolated areas and how an incident would be detected. |
| Emergency evacuation | Review role assignments and employee accountability. | Review alarm awareness, reporting and accountability for isolated workers. |
One task, two reviews
By day, a crew of three cleans a packing hall as production winds down. The review looks at wet floors on the forklift route, spray drifting onto people still at the line, and who tells the crew when the last machine is locked out.
At night, one cleaner finishes the break room and restrooms alone. The review looks at how the cleaner checks in, how they would raise the alarm from the far end of the building, and whether each chemical task can safely be done without anyone nearby.
To use the table, pick a task from your own site, note who does it and when, and ask both columns’ questions. If the honest answer to a lone-work prompt is “we don’t know” or “no one would notice”, that task belongs near the top of your corrective-action list.
For the jobs common in your industry, see the warehouse, cleaning, hotel and manufacturing assessment guides.
Free. Our team calls you back and reviews the jobs you describe, in teams and alone.
Workplace hazard identification checklist
Use this checklist on a walkthrough or in a team meeting. Tick an item only once you have checked it on site; anything left unticked stays open. It covers people, tasks, equipment, the work environment and emergency arrangements.
People
0 of 4Tasks
0 of 4Equipment
0 of 4Environment
0 of 4Emergency arrangements
0 of 6Ticks stay on this device only. The printable checklist needs a free account; use your browser's Print to keep a paper copy.
Map hazards and emergency arrangements
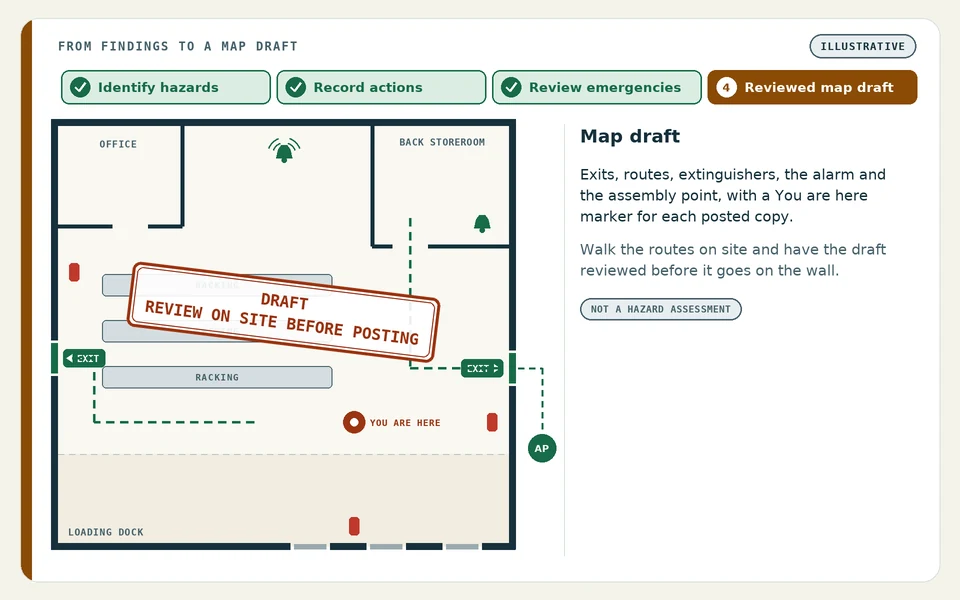
Many findings have a location: the chemical store, the forklift route, the basement where one person works at night, the exit that keeps getting blocked. Marking those locations on a floor plan makes the emergency arrangements easier to check. From each area, can people reach an exit, hear or see the alarm, and get to the assembly point to be counted?
What a reviewed evacuation map shows
- Exits and the routes to them from each area
- A “You are here” marker for each posted copy
- Fire extinguishers, alarm pull stations and first-aid kits
- The assembly point where people are counted
- On your planning copy: the areas with specific hazards and where people may work alone
A map communicates locations and evacuation arrangements. It does not identify every hazard, and it does not replace a full assessment.
An evacuation map also supports an emergency action plan rather than replacing it. Where an OSHA standard requires an emergency action plan, 29 CFR 1910.38 sets out what the plan must include:
- Procedures for reporting a fire or other emergency
- Evacuation procedures, including the type of evacuation and exit route assignments
- Procedures for employees who stay to operate critical plant operations before they evacuate
- Procedures to account for all employees after evacuation
- Procedures for employees performing rescue or medical duties
- The name or job title of each person employees can contact about the plan
The plan must be in writing, kept in the workplace and available to employees, although an employer with 10 or fewer employees may communicate it orally. The same standard requires an employee alarm system and training for the employees who help with an orderly evacuation.
Upload a floor plan or sketch and get a draft map with exits, routes and safety equipment. Check it on site and have it reviewed before posting.
When should you reassess hazards?
Reassess whenever something changes the work, and on a regular schedule even when nothing seems to have changed. OSHA recommends seeking worker input and evaluating planned changes for hazards before changing operations, workstations or workflow, or introducing new equipment, materials or processes.
| What changed | What to review |
|---|---|
| New or modified equipment | Guarding, energy sources, training, and who may operate it alone. |
| Staffing | Fewer people on a shift, new or temporary workers, new lone-work patterns and changed supervision. |
| Processes | New chemicals, materials, speeds or steps, and the cleaning and waste they create. |
| Layouts | Moved racking, new partitions, blocked or new exit routes, and the evacuation map. |
| Incidents and near misses | What happened, why, and where else the same conditions exist. |
| Newly reported concerns | Anything a worker, contractor or visitor reports, including concerns about working alone. |
Emergency action plans have their own review points. Under 29 CFR 1910.38(f), the employer must review the plan with each covered employee when the plan is developed or the employee is first assigned to a job, when the employee’s responsibilities under the plan change, and when the plan changes. If the layout or exit routes moved, update the evacuation map at the same time.
FAQs
What is workplace hazard identification?
It is the process of finding anything at work that could cause injury or illness and noting who could be harmed and when. It comes first, before assessing the risks and deciding on corrective actions.
What is the difference between a hazard and a risk?
A hazard is something that could cause harm, such as a blocked walkway. Risk is how likely the harm is and how serious it would be, such as someone tripping in that walkway while carrying a load.
How do you identify hazards in the workplace?
Review injury records and reports, talk to the people doing the work, inspect work areas while work is happening, check health exposures, investigate incidents and close calls, and think through emergencies and nonroutine tasks.
Who should be involved in hazard identification?
The employer leads it, with supervisors and workers from every task and shift. Include maintenance staff, contractors where relevant, and anyone who works alone or off hours.
Is working alone allowed under OSHA rules?
Federal OSHA has no single standard for working alone, but some standards require a second person for specific tasks, such as an attendant outside a permit-required confined space. Some states add their own rules, so assess each task and check the rules where you operate.
How often should workplace hazards be reassessed?
Whenever equipment, staffing, processes or layouts change, after incidents and near misses, when someone reports a new concern, and on a regular schedule in between.
What should a hazard identification checklist include?
People, including anyone who works alone; routine and nonroutine tasks; equipment; the work environment; and emergency arrangements such as alarms, exits, assembly points and head counts.
Does an evacuation map replace a hazard assessment or an emergency action plan?
No. A map shows exits, routes, safety equipment and assembly points. It does not identify every hazard, and where an emergency action plan is required, the map supports the plan’s procedures rather than replacing them.
What happens when I request a Workplace Safety Assessment?
You send a short form and our team calls you back to arrange it. The review covers the jobs you describe, including tasks done in teams and alone, and organizes the controls and corrective actions that need attention. It is free, and it is not an OSHA inspection or a certification.
Not sure you have found every hazard?
Send the short form and our team will call you to arrange a free Workplace Safety Assessment. We go through the jobs you describe, including work done in teams and alone, and help you organize the corrective actions.
It is not an OSHA inspection or a certification.
Sources: OSHA: Hazard Identification and Assessment; OSHA: Hazard Prevention and Control; OSHA: Workplace Violence; 29 CFR 1910.38 emergency action plans; 29 CFR 1910.165 employee alarm systems; 29 CFR 1910.146 permit-required confined spaces; 29 CFR 1910.147 control of hazardous energy.
Keep going: related guides and free tools
Hazard forms and guides
- Workplace hazards guideHazards by type, with emergency responses.
- Workplace hazard assessment formRecord hazards area by area.
- PPE hazard assessment formThe written PPE review for a work area.
- Job hazard analysis templatesBreak one task into steps and hazards.
- Hierarchy of controlsChoose fixes that last, from elimination to PPE.
- Report a safety hazard to OSHAOnline, by phone, by mail or in person.
Toolbox talks for the team
Emergency planning
- Free evacuation map generatorTurn a floor plan into a draft map.
- Emergency action plan templatesWritten EAPs by industry.
- Exit sign requirementsWhere exit signs go and how they look.
- Emergency exit routesOSHA exit route rules, 1910.36 and 1910.37.
- Fire marshal inspection guideWhat inspectors check and common fail points.
Free tools
- OSHA compliance checklistCheck your safety-program documents.
- Compliance quizTen questions with a score and next steps.
- OSHA fine calculatorEstimate penalties by violation type.
- OSHA penalty lookupSearch real violations and fines.
- Evacuation map advisorWhat your map should show and where to post it.
- Workplace safety by stateState rules and programs.
- Safety by industryGuides for your kind of workplace.
Workplace Safety Assessment guides by industry
Each guide lists the jobs we review, the hazards to look for and a printable worksheet for that kind of workplace.
- Manufacturing Workplace Safety AssessmentProduction, setup, jam clearing, maintenance and shutdowns.
- Warehouse Workplace Safety AssessmentReceiving, forklifts, racking, picking, docks and battery charging.
- Restaurant Workplace Safety AssessmentPrep, hot cooking, dishwashing, cold storage and closing shifts.
- Retail and Grocery Workplace Safety AssessmentDeliveries, stocking, box cutting, checkout and spill response.
- Office Workplace Safety AssessmentScreen work, storage, equipment, reception and office moves.
- Healthcare Workplace Safety AssessmentPatient handling, sharps, disinfection, equipment and shift work.
- Auto Repair Workplace Safety AssessmentVehicle lifts, tires, batteries, solvents, exhaust and refinishing.
- Cleaning and Janitorial Workplace Safety AssessmentCleaning chemicals, wet floors, floor machines, waste and lone work.
- Hotel Workplace Safety AssessmentHousekeeping, laundry, kitchens, maintenance and guest contact.
Published by OSHAMap, a product of GetAgenticApps LLC · 131 Continental Dr, Suite 305, Newark, DE 19713, United States.
OSHAMap is an independent service and is not affiliated with OSHA or any government agency. The review and worksheets are not an OSHA inspection, government approval or compliance certification. Spotted something to correct? Contact us.